So I did some research on the interwebs and figured out it might likely be a bushing that sits in the back of the steering shaft bearing and rides between the bearing and the shaft. Made sense to me, so I procured the parts.
In the meantime, I drove SAAB #1, my 3-door 900S. This is where it's a good idea to have more than one.
Anyway, let's get on with the bushing replacement.

There is a capacitor that stores energy to fire the airbag. so by disconnecting the battery, and then waiting about 20 minutes, the cap will discharge and the airbag will not go "poof" in our face when we undo it.

There are 2 T-30 fasteners behind the steering wheel which hold the airbag to the wheel. Undo them.

That's it.
Wow.
Now you know why stealing airbags out of late-model cars is popular. It's simple to take them out. But please DON'T steal airbags! Thieves are the scum of the earth. Don't be one.
And fortunately for us, there is not much of a market for c900 airbags. Unlikely that yours (or mine) will get stolen.


I like the tidy way the wiring is routed within the wheel through those molded-in clips.
The big nut in the center holds the steering wheel on. Note also the alignment pin just below the nut. The pin is molded onto the top half of the contact ring.
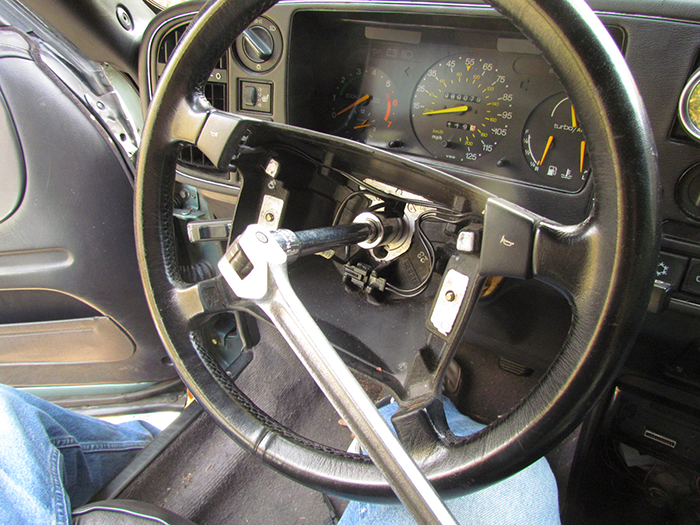
You'll need a large wrench or breaker bar to get the nut off.
I'm pretty sure the nut is a 22mm. I couldn't find my larger sockets, so I used a 7/8 inch socket, which worked fine.

Then, carefully push the connectors back through the access slot in the steering wheel - that's where the blue arrow is.
Pulling the steering wheel out will help get those connectors through the hole. Just wiggle on the wheel and it will slide off.

Notice the black round piece behind the wires. This is the horn contact ring. Proceed with caution at this point. The ring is in two halves and you don't want them to be separated if you can avoid it!
You can guess what happened to mine.

The bottom half is attached to a steel plate.
I had read on the interwebs about "don't let the clock spring come apart" but without pictures or a good description, I wasn't clear about it.
You, dear reader, are now educated about this, you can proceed with caution.
The best approach is to tape the halves together. This picture was actually taken when I put the contact back in, so I had taped it together. I advise doing it when taking it out.
There are 2 screws that hold the contact to the plate. Remove them.
The two wires for the horn are attached to the front, or top, part of the horn contact. There are also 2 wires on the back side of the switch. First we need to get the contact off, then undo the 2 contacts on the back.

If you look at the picture on the left, you'll see that the 2 halves of mine began to come apart! WHAAAAAA! Note the contact ribbon itself - the white object that looks like a reel of tape - inside the connector.
At this point, I realized what was happening, and I taped the thing together, but not before a wind or two of the ribbon came out. Fortunately, the world DID NOT end!
The catch here is that you cannot fully remove the contact ring until you've undone the two connectors on the back.

Sorry that some of these pictures are a bit blurry - it was overcast and I had some camera shake, what with a tool in one hand and the camera in the other. But you'll be able to see what's happening.

Then the contact ring can be slid off the steering shaft.
I didn't mention the function of the contact ring. It ensures that there will be electrical contact to the horn buttons and the airbag while the steering wheel is being turned. It's basically a big reel of ribbon connector that loosens or tightens as the wheel is turned.

That's enough excitement for one post, I think. We're actually pretty far along.
oops, forgot to check "Notify Me"
ReplyDeleteSorry for the delay in responding.
ReplyDeleteOn the non-airbag bearing, I did some searching and didn't find much about non-airbag cars. But I did find this diagram:
http://www.saabusaparts.com/v/vspfiles/photos/big_images/282cdace-675f-4af0-bcae-7ab804bcedcb.jpg
I think that is the factory drawing for both airbag and non-airbag cars. The parts in the box are for airbag cars. I believe that the other parts are non-airbag...the part numbered 7 looks like it might be what you're after.
Seems to me there has to be some sort of bearing support at the top. You could always just take the wheel off and investigate, it's not hard to do.
This comment has been removed by a blog administrator.
ReplyDeleteThis is a GREAT find. Thank you for the instruction. I have started this twice and stopped at the connector to the airbag. When you say that just "slips off" do you mean with a small crow bar? I have been afraid to pull/pry too hard but thanks to your input I will be carefully sliding a screw driver under and leveraging it off. This is the only place where I have seen any input on how to get the connector off. Thank you again!
ReplyDeleteThanks for your kind words.
ReplyDeleteI had to go back and look at the pictures - I couldn't remember what the connector looked like!
It comes off fairly easily. If you see the picture I took with the connector removed, you will note the connector has a plug which fits into the airbag. The connector is pretty hefty, you won't break it easily. Try wiggling it back and forth in different directions, and it may come right off.
Otherwise, use a flat-bladed screwdriver to leverage it off a little at a time as you are thinking. That may be what I did, but the fact that I wrote "slips off easily" tells me mine came off with no hassle. Usually if I have trouble, I make a note of it. Be firm but gentle and it should come apart; I don't think there is much chance of breaking it.
Ok then...Thank you again. The airbag is out, the steering wheel is off and the horn spring came apart when I pulled the wheel off. Is there a way to know how much to wind the spring back on when putting it back together. Also, once again being afraid of breaking something...is that a plug on the front side of that thing that just wiggles off?
ReplyDeleteWhen I get done with this I will pretend I am a mechanic again. In the mean time I feel like an idiot.
Forget the last note...I looked ahead in your directions and all is well. I am about to put the airbag back in and take it for a ride. Thank you for your help and hopefully I won't need to ask anymore questions...
ReplyDeleteLast post..Thank you again for the information. My 900s feels like a new car with that bushing and retainer in place. Air bag was no problem with your input. All feelings of idiocy have been replaced by my feeling like a mechanic again (until the next project).
ReplyDeleteGlad you got it going. It's pretty straightforward. As you know, the tricky part is that pesky clock spring!
ReplyDeleteThanks for the kind words.
Very helpful article, I have a 1997 9000CD and it worked brilliantly for that Model as well. Read through it a couple of times and did remember to tape the dreaded clockspring first. Many thanks for some really great information
ReplyDelete